Showing posts with label glitter. Show all posts

Essence Advent Calendar swatches

Hi!
 Today I'm going to show (FINALLY) swatches of nail polishes that I got in Essence Advent Calender.  
I know it took me 3 months to finally show you the swatches, but they say better late than never, so I dedided to show the to you anyway.

03 My wish list

3 coats no top coat 


09 the night of magic and 04 north pole princess

2 coats od 09 and 2 coats of 04 over 09 ( the creal hexagonal glitter is almost invisible, I'm really not sure what's the point of this top coat. Any suggestions?) 


 08 my dear reindeer

2 coats no top coat 


 01snowflakes are kisses sent from heaven over 08 my dear reindeer

This top coat is quite interesting, although I'm not sure wether I like it or not. I used 2 coats of 08 and one coat of 01, both applied like butter.


 15 from me to you

A dusty raspberry colour, you can never go wrong with this one. Every girl/woman should have a shade like this in her collection (2 coats, no top coat, easy application) 


 15 from me to you and 01 see you in my dreams

One coat of 01 over 15. no top coat. I'll definitely use this top coat again, because it is perfect for spicing up a creamy nail polish.


06 sweet caramel sweets

2 coats, no top coat. This is one of the best nude nail polishes I own. Thank you Essence!
(The only thing that makes me really sad is that Essence nail polishes are pretty fast when it comes to chipping)


 05 meet me at the chimney

A satin finish dusty/pastel green. This shade is definitely the most interesting in the bunc, especially because this is a Christmas collection =). Application was great, and I really like the unique colour. Great base for nail art. See my post about BP-75.


 14 have a very pink-x-mas!

Another raspberry shade. I have a lot of similar shade. Definitely suitable for Christmas time. Great application 2 coats, no top coat.


02 made with love

Sheer milky white nail polish. After 4 coats nail line is still visible. I will definitely not use this one again.


 10 do you hear the jingle bells?

In real life it leans a bit toward pink, so it kinda reminded me on rose gold that is so trendy lately. I really like this shade, it is definitely something special and something I don't have in my collection. the downside of this polish is dry time. The last time I wore it, it just took ages to dry. I applied 2 coats, no top coat.


 07 winter wonderland

A pastel blue for Christmas? Why not, if there is a pastel green, there should be a blue too. Great base for nail art and stamping. I applied 2 coats, no top coat.


07 winter wonderland and 02 candy cane lemonade

This is literally the worst sheer top coat I tried. I already tossed it, because it made me too angry when I wanted to spice up a stamping with this one it only smudged my manicure to something unrecognisable, It melt my manicure.
I used 1 coat on pinkie, 2 on my index finger, 3 coats on my ring finger and 4 coats on my middle finger. It applied uneven and looked really horrible.


 12 berry-tale

A beautiful dark purple with lighter purple and magenta simmer. Too bad it chipped on my nails in less than a day. Good application, 2 coats used for swatches.


 04 what a grey-t night!

This one was on promo pictures and I really couldn't wait to get it in my calendar. I think I got it more towards the end. It is also pretty interesting, and I like it. Shimmer is really subtitle and I like it just the way it is. I used 2 coats, no top coat.


11 kiss under the mistletoe and 03 add on magic!

I played with this one in December. I used RockNail Star stencils and I really like how this manicure turned out. I have to use this stencils again. 
11 (2 coats) and 03 (1 coat). Both applied nicely, 03 dries to a matt finish.


 13 Rudolph's favourite and 01 message from the north pole

I really don't know how I managed to delete swatches of 13 Rudolph's favourite from my computer, but you can also see the colour in this picture (2 coats, great application). Over I applied one coat of 01 message from the north pole. This is also one of the best top coats, just look at that purple/gold shifting shimmer!


So, what do you think? Essence did a good job?
I was really pleased with the colours, but sadly Essence nail polishes don't last long on my nails (The used to, but it looks like that they changed their formula when they changed the bottles, because since that moment on, essence nail polishes chip too fast).


BOP-220 water decals (Lady Queen)

Lady Queen is an international beauty shop, selling nail art,make-up and tools, jewellery, fashion bags etc. They offer free shipping all over the world. Here is a link to their nail art department where they have tons of nail art related items: stamping plates, glitters, rhinestones, dotting tools, brushes, foils and many other items. I personally think that they offer the biggest selection of nail decalls, which are super easy to use and can give that special cherry on the top to a perfect manicure.


Today I'm going to present you BOP-220 water decals. They cost 2,15$. These feather decals come in 4 different colours (blue, yellow, pink and purple). Because lately pink grew on me I decided to go with pink ones. 
Here is a picture:
Isn't the packaging super cute?

You can see that inside there are 10 nails shaped decals.
Size:
the smallest:
length 2,7 cm
width 1,1 cm

the biggest:
length 2,7 cm
width 1,6 cm

At the back (didn't take a picture) there are easy instructions on how to use these decals. You seriously can't do anything wrong here!

Here is how I used them:
1. I polished my nails.
2. When they were dried I prepared a cup of water and scissors.
3. I cut out the desired design
4. I put the design in the water.
5. I gently slided the design of the paper and put it on my nails.
6. I applied top coat.


Because these decals were too long for my nails I decided to cut out each feather individually and randomly place them on my nails!

My opinion:

 These decals are really easy to use. This sheet will last me for 2 full manicures, or 10 if I use them as an accent finger. 
The only downside I see is that these decals are not reusable. I really love this feather design!


Here is my manicure with these decals:
I also decided to add thin glitter stripes on my nails ( I actually not like it, but I did not take pictures before adding the stripes).


For all of my readers Lady Queen offered a coupon code for 15% discount. Use WEXS15 at the checkout. 


Avon Magic Effects Liquid Sequin

Hi!

Today I prepared a bit different post for you, my dear readers! 
Many of you problably don't have these fancy tools and nail art stamping plates for creating beautiful and easy christmas or new years themed nails. Today I prepared a post on how you can easily create simple but pretty manicures for the holidays using Avon Liquid Sequin nail polishes.

Danes sem za vas moje predrage bralke pripravila malo drugačno objavo.
Mnogo izmed vas nima božično ali novoletno obarvanih šablon doma, ampak to še ne pomeni, da z malo truda ne morete ustvariti lepih in preprostih prazničnih nohtov. Za vas sem pripravila 3 vodiče, kako si lahko pričarate praznično vzdušje na nohtih z laki iz Avonove kolekcije Liquid Sequin.

This collection includes 4 different nail polishes in  Glitterati, Sequin, Dazzle and Glimmer ( I have 3 from this collection as shown in the picture below).

Kolekcija Liquid Sequin Vsebuje 4 čudovite praznične lake z imeni Glitterati, Sequin, Dazzle in Glimmer (Vse razen zadnjega lahko vidite na spodnji sliki).


Now I'll show you picture tutorials on how to create 3 easy but still pretty holiday themed manicures.

Sedaj vam bom predstavila 3 slikovne vodiče za preproste, a vendar kljub temu simpatične praznične manikure.


Chirstmas Tree and Gifts

Božično drevesce in darila


Here are detailed instructions:

1. Polish your index, ring and pinkie with black base. Use Avon Sequin on all of the fingers (I applied 1 coat over black and 3 coats on my middle finger). 

2. With a thin brush or toothpick draw 2 thin lines.

3. Shape a bow (also with toothpick or brush).

4. Polish a thick coat of Sequin on a peace of foil and let it dry.

5. When the peace of Avon Sequin on the foil is dry, cut out Christmas thee with scissors.

6. Put clear polish on your ring finger and than gently place Christmas tree on top. Add a layer of top coat.

Optional: You can add glitter from Avon Sequin to add Christmas light to the tree.

Navodila:

1. Prstanec, kazalec in mezinec prelakiraj s črnim lakom za nohte. Na vse nohte dodaj plast Avon Sequin. Čez sredinec pa nanesi 3 plasti, da prekrije belo konico nohta. 

2. S tankim čopičem ali zobotrebcem nariši tanki črni črti.

3. S čopičem ali zobotrebcom nariši še mašnjico.

4. Na kos folije nalakiraj debelo plast Avon Sequin in počakaj da se posuši.

5. Suh lak odlepi in s škarjami izreži obliko božičnega drevesca.

6. Na prstanec najprej nanesi plast prozornega laka, nato pa nanj previdno položi izrezano drevo. Dodaj nadlak.

Opcijsko: Z zobotrebcem lahko iz laka Avon Sequin dodaš na drevesce bleščice in s tem drevescu dodaš lučke. 

Because I wasn't completely satisfied with this manicure I decided to replace Christmas tree with a bow for a gift. This is what I ended up with:

Ker z videzom smrečice nisem bila popolnoma zadovoljna sem na prstanec narisala mašnjico in naredila na nohtu še eno darilo. Takole pa je izgledala ta manikura:


You can see how Avon Sequin looks on it's own on my middle finger.

Kako izgleda Avon Sequin brez podlage si lahko pogledaš na mojem sredincu.

Glittery Snowflake Wrapping paper

Bleščičasti papir za zavijane s snežinkami


Instrucitons:

1. Use Avon Glitterati for a base.
With a thin brush or a toothpick draw a thin line.

2. Add 3 more lines to form a star.

4. On every second line in star add 4 more smaller lines. Add dots on the other 4 lines you haven't used.

4. Play on the rest of the nails. Draw stars, dots.... and apply top coat.

Navodila:

1. Za podlago uporabi Avon Glitterati. S tankim čopičem ali zobotrebcem najprej nariši tanko belo črto.

2. Dodaj še 3 tanke bele črte, da dobiš zvezasto obliko.

3. Na vsaki drugi krak zvezde nariši še dodatne 4 črtice, na prazne krake pa naredi pikice.

4. Pozabavaj se z ostalii nohti. Riši črtice, pikice, zvezdice, da dobiš morje snežink. Nanesi še nadlak.


A blurry pictire for the glitter feel.

Zamegljena slika, da dobite občutek kako zgleda ta lak na nohtih.


New Year's eve fireworks

Novoletna manikura z ognjemetom


For this manicure you will need scissors and scotch tape.

Za to manikuro boš potrebovala lepilni trak in škarje (lahko z vzorčki).


Instrucitons:

1. Paint Black base on index and middle finger and Avon Dazzle on your pinkie and ring finger.

2. Cut out 2 pieced of scotch tape and place it on your skin (it will lose some stickiness and make no damage to your manicure). Place the tape on your nails, and polish Dazzle over, quickly remove tape.

3. Cut 4 thin and straight pieces of tape (also stick it to the skin) and make a star shape on your ring finger. Polish over black polish and quickly remove tape.

4. Apply top coat and you're done!

Navodila:

1. Kazalec in sredinec nalakiraj s črnim lakom, Avon Dazzle nanesi na mezinec in prstanec. 

2. S škarjami izreži 2 kosa lepilnega traka in ga nalepi na kožo. S tem boš zmanjšala lepljivost lepilnega traka in zmanjšala možnost, da si pri tem poškoduješ manikuro. Kosa nato nalepi na kazalec in sredinec ter ju prelakiraj z Avon Dazzle. Lepilni trak odstrani, ko je lak še moker.

3. S šakrjami izreži 4 zelo ozke kose lepilnega traka (zopet jih najprej nalepi na kožo). Trake nalepi v zvezdasto obliko na prstancu. Čez prelakiraj črni lak in lepilni trak odstrani.

4. Nanesi nadlak za sijaj in obstojnost.


 You can see Avon Dazzle on it's on on my pinkie finger.

Kako izgleda Avon Dazzle brez druge podlage lako vidiš na mojem mezincu.


V tem katalogu lahko Avon Sequin lake ob nakupu kateregakoli izdelka iz kataloga dobiš za samo 2,5€. 

This was sent to me for review. 


Look By Bipa Pink Shot and pink glitter dust

Hi!

All of you who follow me on Instagram or on Facebook you know that I try to regulary show you pictures of what I got inside my windows . You can go there and check out my new polishes and nail stuff. 

Today I decided to show you neon nail polish I got today in Bipa's advent calendar in combination with pink glitter dust that I got in window 9 (also Look By Bipa)

Here are the pictures of Pink Shock (2 coats)
I had some difficulties with application, but I think despite that I did quite well.


Here are my nails after I added glitter dust. This is not completely what I wanted to achieve, because I wanted to make some geometric patterns, but the base was still a bit wet when I was applying glitter dust, this is why I ended up with randomly adhered dust, but I still like it.


Colours were shifting from gold and  yellow to pink. I must say I'm not a glitter fan, but this glitter dust really impressed me, and I'll definitely try it out again.


What do you think? It is not perfect, but they say practice makes it perfect =)


Untried Polish Challenge - The most Expensive

Hi!

Again I'm a bit late with my post from Untried Polish Challenge, but here it is! This time I had to pick up the most expensive from this pile. I paid 10 € for it, because I really wanted it (in my defence, this polish was in my pile only for a few weeks). I do have more Expensive polishes, but they were all already worn at least once.
The most expensive polish is Essie Set in Stones, but because I bought it to layer glitter over other polishes I had to pick up a base polish for it and I decided to go with Essie Lapiz of Luxury. I went Essie all the way! 
Although I'm not a glitter fan, Essie Set in Stones was a must for me, and I'm really happy that I have it =)

I used:
Base Essie Lapiz of Luxury (2 coats)
I sponged 2 coats of Essie Set in Stones on my tips and polished 1 coat over my ring finger.
Here it is, simple but classy =)


The colour is a bit off, but I had difficulties with taking pictures. I hope this won't happen again =)


What do you think? Was it worth the money?


Madam Glam Has Never Been so Chic!

Hi!
Today I'm going to show you the second part of the swatches od the polishes I received from Madam Glam store this week.

Never Been So Chic

It is a beige creme nail polish. I applied 3 coats, the polish dried to a lovely shine (no top coat in the pictures). 


This nail polish makes my hands look really tanned =).


This is an ideal base for some nail art, that is why I decided to use it as a base for my nail art Wednesdays.Probably the picture below looks familiar =). 


BFF

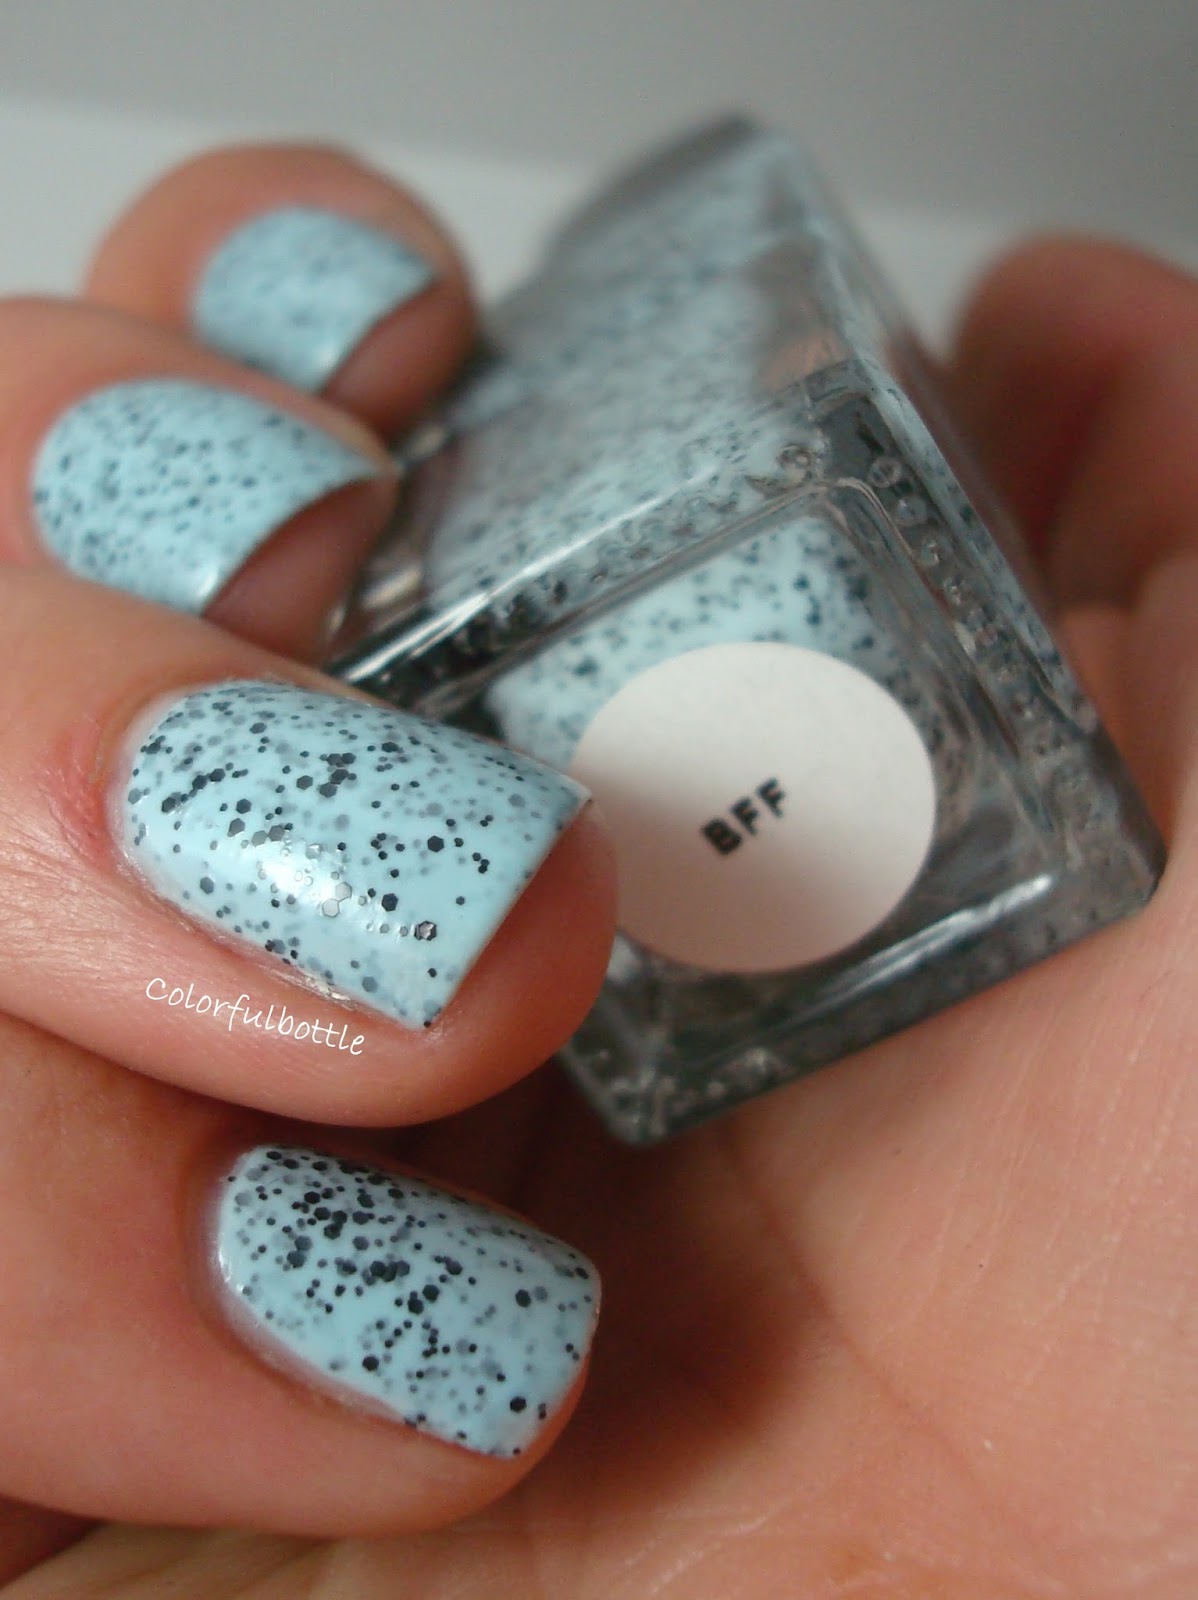
This one is a light blue chreme base filled with black dots of various sizes. I applied 4 coats, but the polish dried quickly. I have it on my nails for 2 days now and I haven't noticed any chips. This one is really something special. I don't have anything like this in my collection.


Because I just had to improve my stripping tape skills I played around with tape and I ended up with this manicure. I love it! Don't you?
Base: Madam Glam BFF
Top: Essie Licorice 


If you want to see the first part of my swatches you can find them here. Overall I'm really impressed with these nail polishes, they dried fast and had a nice shine (especially the creme finish). The store offers a lot of different colours and finishes (they also have a matte top coat). I haven't tested the wear time, but  BFF stayed on my nails for 2 whole days without any chips (that is really a lot for me)

I know I already told you this, but again I'd like to remember you, that Madam Glam offers a special discount code. 

This polishes were sent to me for reviewing purposes. See my disclosure policy.